Following on from my post on i2s playback with Raspberry Pi Pico, this is a write up of the recording lab notes I made in 2023. This was actually the trickier bit - getting an i2s MEMS microphone to capture audio and write it to a WAV file on an SD card. I completed this in 2023, but only got round to writing it up in 2026 - better late than never!
The project brief was to play a sound, record a response, then save it for later. So I needed both playback (covered in the previous post) and recording. The playback was straightforward enough, but recording had some proper gotchas.
Why i2s and not PDM?
I’d initially considered CircuitPython for this project, but it only supports PDM microphone input, not i2s microphones. I’d already specced the SPH0645 i2s MEMS microphone, so I pivoted to MicroPython which has full i2s support for both input and output.
Note that in 2026 there is a CircuitPython_PIO_I2S library that supports i2s input using RP chip PIO state machines - I could have used this.
The difference? PDM (Pulse Density Modulation) and i2s (Inter-IC Sound) are different digital audio protocols. The i2s protocol gives you more control and better quality, which is what I needed here.
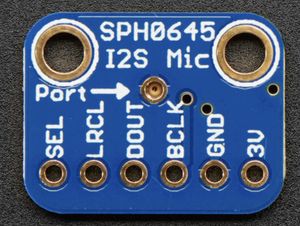
The Microphone - SPH0645
The SPH0645 MEMS i2s microphone breakout is a digital microphone that outputs i2s audio data.
Wiring the Microphone
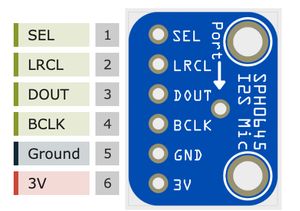
The mic needs these connections to the Pico:
- 3V to Pico 3V3
- GND to Pico GND
- BCLK (bit clock) to GP18
- DOUT (data out also called sound data) to GP20
- LRCLK (left/right clock, also called WS or word select) to GP19
- SEL - leave unconnected (defaults to left channel mono)
The bit clock should run at 2-4 MHz typically, though I found it works a bit slower too.
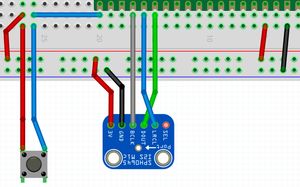
The Wiring
Here’s how it all fits together on a breadboard:
Writing WAV Files
Before being able to record audio, we need the codec to write to WAV files, otherwise there’s not really anywhere useful to record to. At the time of the project, I’d not discovered any existing WAV file handling libraries for MicroPython, so I wrote my own based on the WAV file format specification. This includes writing the RIFF header, fmt chunk, and data chunk with the correct sizes.
I put this code into some classes in a wave_file.py module:
import struct
class WaveFileHeader:
    def __init__(self):
      self.data_size = 0xFFFF
      self.wave_fmt = 1 # PCM
      self.channels = 1
      self.sample_rate = 22_050
      self.bits_per_sample = 16

    @property
    def byte_rate(self):
        return self.sample_rate * self.channels * self.bits_per_sample // 8

    @property
    def block_align(self):
        return self.channels * self.bits_per_sample // 8

    def to_bytes(self):
        data = bytes(b"RIFF") # riff header
        data += (self.data_size + 36).to_bytes(4, "little") # 32, unsigned, excluding size and riff
        data += bytes(b"WAVE") # file type
        data += bytes(b"fmt ")  # format chunk
        data += (16).to_bytes(4, "little") # length of format data above
        data += self.wave_fmt.to_bytes(2, "little")
        data += self.channels.to_bytes(2, "little")
        data += self.sample_rate.to_bytes(4, "little")
        data += self.byte_rate.to_bytes(4, "little")
        data += self.block_align.to_bytes(2, "little")
        data += self.bits_per_sample.to_bytes(2, "little")
        data += bytes(b"data")
        data += self.data_size.to_bytes(4, "little")
        return data
The __init__ method sets up the default values for the WAV file header, with a placeholder for the data size. The WAV format needs the file size written into the header, but you don’t know those until you’ve finished recording.
The byte_rate and block_align properties calculate values based on the sample rate, number of channels, and bits per sample. The byte rate is how many bytes of audio data we have per second, and the block align is how many bytes per sample frame (channels × bits per sample ÷ 8). For example, mono 32-bit audio has a block align of 4 bytes.
The to_bytes method constructs the actual byte sequence for the WAV file header according to the specification.
After recording, we can update sizes, and update the file headers. The mic recording code will use this, but at the end of the recording, do some file pointer gymnastics to write the header at the file start.
See https://github.com/orionrobots/pico-i2s-recording/blob/main/src/wave_file.py for the full code.
Recording Audio
I wanted to record audio until some stop event occurred, like a button or input. I put the recording in a file managed_mic.py. This wasn’t class based, as the logic fit in a single function. We start with imports:
from machine import Pin, I2S
import wave_file
It makes use of the wave_file module we created to write the WAV file headers. The recording function takes an output filename and a callback used to decide when to stop recording:
def record_from_mic_until(
        output_filename,
        stop_event_cb,
        sck_pin_number=18,
        ws_pin_number=19,
        sd_pin_number=20,
        bits_per_sample=32,
        sample_rate=22_050,
        ):
    """
    output_filename - wave file to output to. will overwrite
    stop_event_cb - function returning false until recording should stop
    """
I’ve left pydoc on the stop event callback, but it’s a function that should return False until the recording should stop. This lets you use any event you like - a button press, a timer, etc. Other inputs are:
- output filename - the WAV file to write to. This will be overwritten if it already exists.
- sck_pin_number, ws_pin_number, sd_pin_number - the GPIO pins to use for the i2s microphone
- bits_per_sample and sample_rate - the audio format to record in. 32-bit is recommended to reduce DC offset. These defaults match the wiring of the SD and mic in the project, but you can change them if needed.
We start by setting up the wav file details:
    wave_header = wave_file.WaveFileHeader()
    wave_header.bits_per_sample = bits_per_sample
    wave_header.sample_rate = sample_rate
    wave_header.channels = 1
Then we set up the mic:
    I2S_INTERNAL_BUF_LENGTH = 40000
    SAMPLE_BUF_LENGTH = 10000

    mic = I2S(1,
            sck=Pin(sck_pin_number),
            ws=Pin(ws_pin_number),
            sd=Pin(sd_pin_number),
            mode=I2S.RX,
            format=I2S.MONO,
            bits=wave_header.bits_per_sample,
            rate=wave_header.sample_rate,
            ibuf=I2S_INTERNAL_BUF_LENGTH,
        )
This sets up the microphone/i2s connection. It’s in receive mode (RX), with the specified format. The internal buffer is set to 40000 bytes to allow for smooth recording without overflow. It’s a mono recording, as the SPH0645 is a single-channel mic.
I recommend using a try/finally to wrap the file writing to ensure the mic is deinitialised, and the file closed, even if there are problems. This maximises the chances of the recording being saved correctly, and the mic being ready for the next recording.
    output_file = None
    try:
        output_file = open(output_filename, "wb")
        print("File open, writing header")
        # write the dummy header
        output_file.write(wave_header.to_bytes())
        audio_bytes_written = 0
        .
        .
        .
    finally:
        print("Cleaning up")
        if output_file:
            output_file.close()
        mic.deinit()
There’s a gap there for the actual recording, but the key point is that the mic is deinitialised in the finally block, so it will be ready for the next recording even if something goes wrong. We’ve also written a “dummy” header - it has the correct format, but the data size is a placeholder. We’ll update it at the end of the recording when we know how much data was actually recorded. This still leaves a small gap for data to be wrong in the header if the recording is interrupted, but it’s better than nothing.
With that setup, we also need a memory buffer for recordings to go into before being written to the file. This code is inserted into the try/finally block, after the header is written:
        mic_samples = bytearray(SAMPLE_BUF_LENGTH)
        mic_samples_mv = memoryview(mic_samples)
The variable mic_samples is a bytearray that will hold the raw audio data read from the mic. The memoryview allows us to read data directly into this buffer without creating new objects, which is more efficient on a microcontroller with limited memory.
The next thing is the loop that records until stopped:
        while not stop_event_cb():
            bytes_from_mic = mic.readinto(mic_samples_mv)
            if bytes_from_mic > 0:
                bytes_written = output_file.write(mic_samples_mv[:bytes_from_mic])
                audio_bytes_written += bytes_written
This loop reads audio data from the mic into the buffer until the stop event, and then writes it to the output file. The readinto method fills the mic_samples buffer with new audio data, and returns the number of bytes read. If any bytes were read, we write them to the file and update our counter for how much audio data was written.
Now before we hit the finally, we should update the bytes and write a real header:
        # update header
        print("Recording complete. Finalising header")
        output_file.seek(0)
        wave_header.data_size = audio_bytes_written
        _  = output_file.write(wave_header.to_bytes())
This is the file pointer manipulation, since the header has a fixed size, we can seek to the start of the audio file, and overwrite the header without fear of overwriting any audio data. We update the data_size field in the header to reflect the actual amount of audio data recorded, and then write the header bytes back to the start of the file.
See https://github.com/orionrobots/pico-i2s-recording/blob/main/src/managed_mic.py for the full code.
The DC Offset Problem
Here’s where it got interesting. When I first tried recording at 16-bit, I got a massive DC offset in the audio - the waveform was way off-centre. This is a known characteristic of MEMS microphones.
The fix? Record at 32-bit. At 32-bit, the DC offset drops to within 5% as per the datasheet spec, which is manageable. You can remove it in post-processing with Audacity if needed, but it plays back reasonably well as-is.
One other tip from testing: don’t get too close to the mic when recording - you’ll get pops that make the offset worse. And keep it away from strong magnets (like those in a laptop!). I found this out the hard way when my MacBook made the readings go wonky.
The SD Card
The Pico storage (flash) is very limited, so writing audio data there would be problematic. Instead, we can write to an SD card. The sdcard library provides a way to interface with the SD card, and you can use the os module to mount it as a filesystem.
I used the Adafruit micro SD card breakout running at 3.3V.
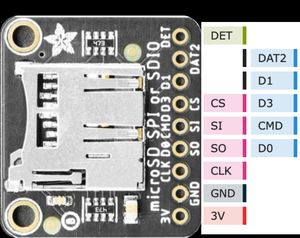
Connections:
- 3V to Pico 3V3
- GND to Pico GND
- CS (SPI chip select) to GP1
- CLK (SPI clock) to GP2
- SI (SPI Pico to device) to GP3
- SO (SPI device to Pico) to GP4
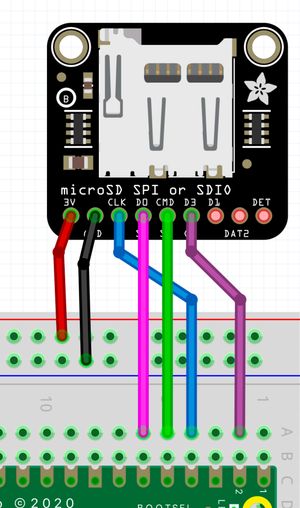
The card must be formatted as FAT32. I used the sdcard library from micropython-lib which you can install with Thonny’s package manager or using mip.
$ mpremote mip install sdcardWe then needed some code to mount it and make it available to our recording code. This is in sd_card.py - again start with imports:
from machine import Pin, SPI
import sdcard
import os
import ucontextlib
This uses the sdcard library, and contextlib so I can make a python context manager to handle mounting and unmounting the SD card cleanly. The mount function sets up the SPI connection, initializes the SD card, and mounts it to the filesystem:
def mount():
    sd_spi = SPI(0, 10_000_000,
                         sck=Pin(2), mosi=Pin(3), miso=Pin(4))
    sd = sdcard.SDCard(spi=sd_spi, cs=Pin(1))
    os.mount(sd, "/sd")
    return sd
This sets up the SPI connection on SPI0 with the specified pins and speed, initializes the SD card, and mounts it to the “/sd” directory. The unmount function simply unmounts the SD card:
def unmount():
    os.umount("/sd")
Finally, we can create a context manager to handle this cleanly:
@ucontextlib.contextmanager
def sd_mounted():
    sd = mount()
    try:
        yield
    finally:
        os.umount("/sd")
This safely ensures that the SD card is unmounted even if there are errors while it’s mounted. You can use it like this:
with sd_mounted():
    # do stuff with the SD card here
Using MPRemote
A brilliant discovery on this project was mpremote - the MicroPython remote control command-line tool. It made development so much easier than constantly switching to Thonny.
# Copy files to the Pico
mpremote cp wave_file.py :

# Run code
mpremote run main.py

# Get a REPL
mpremote
You can install it with pip install mpremote. Highly recommended for Pico development.
The Complete Project
The final device does this:
- Press button once - plays a pre-recorded sound from SD card
- Automatically starts recording the response
- Press button again - stops recording and saves as recordingN.wav
- Recordings are numbered sequentially: recording1.wav, recording2.wav, etc.
The flow is like this:
button -> start recording to sd card -> button -> stop recording and finalise the fileThe complete working code with all the modules is available in my pico-i2s-recording repository on GitHub. It includes:
- WAV file reading and writing (
wave_file.py) - i2s recording management (
managed_mic.py) - SD card file handling (
sd_card.py) - Button-triggered record/playback logic (
main.py) with some debouncing logic for the button
Gotchas and Tips
Things I learned while making this project:
- Always use 32-bit for recording - 16-bit has too much DC offset
- Deinit your i2s devices - failing to do this means they won’t work again until you reset the Pico
- Keep magnets away - they mess with the MEMS microphone
- Don’t record too close - causes pops and worse DC offset
- Format SD as FAT32 - other formats won’t work with the sdcard library
- Use separate i2s IDs - I2S ID 0 for playback, ID 1 for recording
Summary
Getting i2s recording working was more involved than playback - the DC offset issue and WAV header writing took a bit of figuring out. But once you know the gotchas, it’s actually quite straightforward.
The combination of i2s audio, SD card storage, and MicroPython on the Pico makes for a capable little audio recorder. And at around £20 in parts, it’s pretty good value too.