This week I’ve been taking photos of a Sparkfun chassis I have been using with my student, and for demonstration purposes. The chassis is great in terms of access, being easily found and being relatively easy to assemble. However, to get the photos I needed, I had to disassemble the chassis.
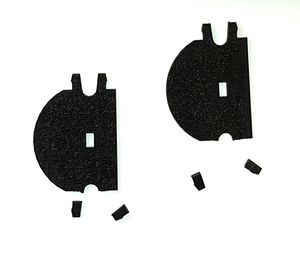
This was not the first time I had done so, and on doing so this time, two of the plastic parts broke. They hold the motors in place. The same part snapped in the same place on both sides. It was being stubborn, and I was being impatient.
How to replace or repair this part?
My first thought was if I had a suitable glue. These are made from ABS, not a particularly easy plastic to glue. The area where they snapped would be under tension, and would be hard to clamp with the glue. Glue was not going to work.
I went to the maker community, and mentioned it. The response was to 3D print a replacement part. I have a 3D printer, why not.
Measuring and designing
I used my trusty callipers to measure the existing part, and make sketches in FreeCAD using the constraints I inferred from the measurements. The one thing I couldn’t measure well is the large curve, so I guessed at 20mm.
I padded the sketch into 3D, then projected it 1:1 onto an A4 drawing, so I could print it paper first and check the measurements. This let me refine and dial in the curve.
3D Printing
My printer is a FLashForge Finder, handy in that it is nicely designed and fairly reliable. However, it is limited to it’s own FlashPrint software, and prints only PLA.
My first attempt at printing came with too much of an “elephants foot”, where the first layer is squashed down and comes out wider. Only by a mm or so, but this was enough to make the slot fo the motor not work.
I dialled it in with a couple of changes (I’ve been slowly refining my settings for a while now):
- Slow down for the first 3 layers
- There was an over-extrusion at 109%. On the first layer, I reduced this to 100%.
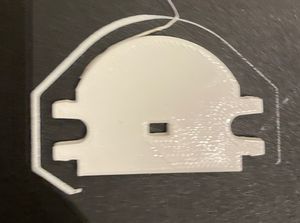
This reduced but didn’t completely eliminate the elephants foot. When I had 2, I finished them a little with a craft knife for a perfect fit.
Fitting them
The motor brackets fit the motors and onto the chassis fairly well.
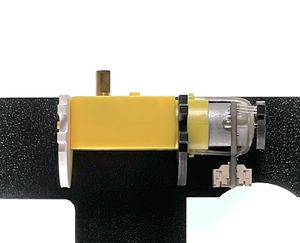
However, one of the snaps in the same area snapped off on one side while fitting. It still makes a good rigid connection for now.
The files
As this is a SparkFun part, I didn’t feel it was right to publish the CAD files for this.