I am a regular mentor at a Coder Dojo Kingston University, a place where we mentor children on their journey to learn about programming and technology. I’ve mostly been mentoring in Python there, but they have also had robot tracks, on and off.
I was asked if I could prepare some plans for robots (and sheets) for children at the dojo to learn robotics in ways inspired by my books, which I was happy to do. The Dojo already had a bag with a fleet of robots, in various conditions. It was also to be based around Raspberry Pi Pico and Micropython.
The idea was that children would program robots, loaded with sensors. The robots would be provided at the dojo, and remain there, so we’d need to build and maintain them.
This meant a balance of low cost, fun functionality, and ease of maintenance. I also wanted to make sure that the robots were easy to build, and that the parts were easy to get hold of. Making trade-offs like these come with every robotics project.
Another consideration is that the robots will be a popular activity, and there will initially be limited mentor capacity, so children need sheets that are fun from the outset.
How I started
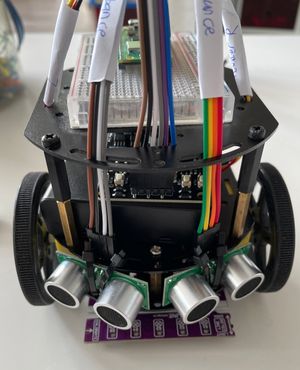
I started by assessing where the robots were at. There were 6 robots based on the Adafruit Mini round chassis, and 2 other robots with incomplete different chassis. I decided to focus my effort on the Adafruit chassis, as they were all the same, and we could use the same parts for all of them.
The picture shows the mini round chassis. Some of the robots had breadboards I could use, but some I’d need to add a breadboard. Most also had battery boxes I could use, with a couple missing. The robots all had motors. Some needed a few mounting posts, but this is something I usually have spare in my lab.
The other part to assess was the electronics. There were some Arduino Nano’s for the robots, and some had those in the Adafruit Feather format along with a dual motor Featherwing. However, this was intended to be Raspberry Pi Pico based, so I’ll need to find a compatible board for them.
None of the robots had sensors.
Specifying the controller
The first is to start with the controller. Although there are variations on the Raspberry pi Pico, like the rp2040 feather, I decided to go with the Raspberry Pi Pico, as it is the cheapest, and the most available. Since we could have an advanced sheet on Bluetooth remote control, I specified Pico W’s.
Since this was going to be a fleet of robots, I opted for Pico WH’s with the headers included, so I don’t need ot solder them all. This also makes it easy for other mentors to buy the parts and build one.
Specifying the motor driver
I wanted a motor driver that was easy to understand instead of hiding things. For this I remembered the Cytron Maker Drive, a dual motor driver with a simple interface, and provides power for the Raspberry Pi Pico. However, at the time I was specifying this, those driver were out of stock.
I settled on a very close cousin, the Cytron 3A driver. This is very similar to the maker drive, but a little more expensive and larger. Both have buttons to test motors with, LED’s to indicate what is going on. They also have 6 inputs to control them. See my previous post on the coder dojo robot, Adapting Pinouts for Robot Worksheets for more details.

The buttons let you test the motors, controlling in the same way the Raspberry Pi Pico would.
The next parts to consider were the sensors.
Distance sensors
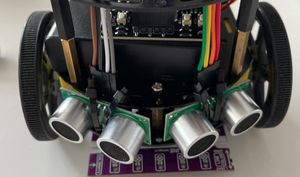
To keep things low cost, I used RCWL-1601 Ultrasonic distance sensors. These are 3v3 compatible sensors, unlike their counterparts the HC-SR04. They will work with the same code as the HC-SR04s.
They don’t have the same size though, and some adaptation is needed, as existing brackets won’t work. I was able to fit them using cable ties. A little bit of a bodge, but it works.
These sensors are great for activities, we can start with showing distance on screen and plotting it in Thonny, then object or wall avoiding, we can look at following. There are more advanced techniques available too.
Line sensors
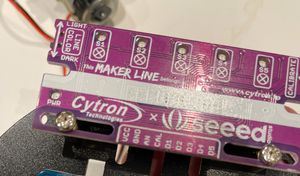
Line following is an easy and fun way for kids to start robotics. For this I chose the Cytron Maker line. The maker line is very easy to use, with a digital output pin for each sensor, and switches to calibrate the sensor against the lines. They have 5 sensor elements, are easy to mount with a couple of bolts on the robot. They cost only £8 too, so this was an easy choice.
See Raspberry Pi Pico Line Follower to see the code I wrote for them and how I mounted them.
Encoders
I initially specified encoders for odometry, using the Waveshare photo interrupter sensors. A pair of these, with encoder disks will mean that kids could have experiments in making the robot drive a certain distance, in straight lines or make certain turns.
These encoders cost £3.90 each - not expensive. However, we decided not to keep them, not just to keep costs down, but because the activates with these are trickier and perhaps less immediately fun than the other sensors. We can review that later.
Sundry parts
A bunch of jumper wires was needed to connect components to the Raspberry Pi Pico.
Overall cost
Note that I’m not buying chassis, wheels or motors for these, since the dojo already had them. With all the parts specified, plus postage on them, I got this to £31 pounds per robot.
I put the costings into a spreadsheet, so the Dojo organisers could clearly see the cost of making 6 robots work. Adding the mini round kit would add another £24 per robot if we added new robots, so this would be around £70 per robot.
Total list:
| Part | Cost | Notes |
|---|---|---|
| Raspberry Pi Pico WH | £7.20 | You could get the cheaper Pico for £3.60 |
| Cytron MDD3A | £8.50 | Get the £4.50 maker drive if you can |
| RCWL-1601 distance sensor - £3.90 * 2 | £7.80 | |
| Cytron Maker Line | £8.00 | |
| Jumper wires | £6.00 | |
| Breadboard 400 | £3.00 | |
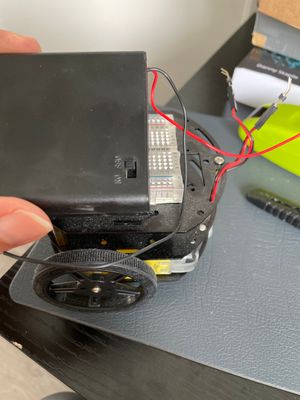
| 4xAA battery box | £1.80 | |
| Adafruit mini round chassis | £24.00 | Optional, if you need a chassis |
| Postage | £3.99 | |
| Total | £70.29 |
Note this doesn’t include the cable ties.
Building and programming a more advanced robot
If you are starting with robotics, and would like to start from the beginning and work to more advanced robots, including 3D CAD design of a custom chassis, learning about distance, encoding and inertial measurement sensors, programming a robot to estimate it’s location in an arena, try out Robotics at Home with Raspberry Pi Pico. This also has deeper dives into choosing parts and making robot design trade-offs.