I sometimes have suggestions that the books in my robots are a little expensive to build. They are sub £200, and can be closer to sub £100 if you get clever with parts. Considering that I recommend a number of sensors and encoder read motors, I think they represent good value, but are a bit pricier than a simple Arduino with two wheels on motors.
I am reminded how low cost they are, when the Waffle Pi robot is considered a low-cost baseline for ROS robotics at £1665! I’ll keep on doing what I do - trying to find low cost ways for beginners, bodgers and makers to make robots with increasingly interesting capabilities and possibilities.
It’s also worth considering that a PiWars entry robot may spend significantly more than this on their robot.
What are the constraints I use?
I took slightly different approaches in “Learn Robotics Programming” and “Robotics at Home with Raspberry Pi Pico”. Both books assume a reader does not have access to 3d printing, laser cutting or CNC machining.
The Chassis
In “Learn Robotics Programming” I constrained myself to robot parts that can be bought and a few simple at home bodges. It does not expect the reader to get any cutting skills and recommends a bought chassis.
In “Robotics at Home with Raspberry Pi Pico” I covered making a CAD design of a robot that could be cut from Styrene plastic sheets by making themselves a paper stencil and cutting with simple hand tools. This allows more flexibility than bought robots, and is a bridge to the 3d printing and laser cutting.
The bought approach is less flexible, but more beginner friendly. The 3D CAD approach allows the reader to imagine more interesting chassis builds, and invites them to experiment with materials, but for a first robot, means it takes more steps to getting a moving thing.
In the articles I wrote for MagPi on low cost robotics, I went for bodging with a lunchbox, which falls somewhere between the two - with a bit of measuring, drawing and cutting, but not needing the CAD work. This worked, and in the books I also suggested toy-hacking as a way to get a chassis.
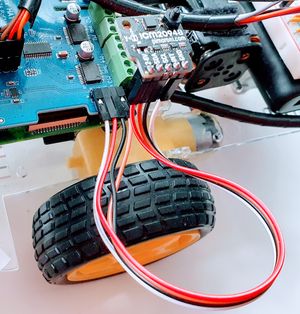
The motors you want to use will have a bearing on the chassis. At the time of writing, very few commercial chassis designs support the N20 micro metal gear motor profile, with most supporting the plastic gear TT-motors. I do take a position on motors with encoders - which unless you build with stepper motors or expensive Dynamixel motors, represent a good value way of making controlled robot movements. You can add single encoders to many plastic gear motor chassis, but quadrature encoder assemblies are a bit harder to find. The FIT-0450 comes to mind as great compromise here, but doesn’t fit in many TT motor chassis designs.
I also notably have settled on the 2-wheels plus a castor/support design. Someone starting robotics will be testing them on home surfaces - four wheel drive robots perform very badly turning on carpet.
Another constraint on the chassis was the size, making it not too small like the Zumo, which requires advanced robot skills, and not bigger than frequent robot competitions. I’ll admit the Piwars size guide is a pretty good one to follow.
The Electronics
The main board in each book depends on it’s target, with a Raspberry Pi Pico or Raspberry Pi. These again represent very low cost controllers in the microcontroller or SBC space. A reader can of course consider a Jetson Nano or similar, with code modifications for ultra performance and bigger robots, but a beginner will find that expensive. It has been tricky with the Raspberry Pi availability.
I’ve been finding there is a lot of runway for the very low cost of the Raspberry Pi Pico, and have designs on taking that further, doubling them up, or code that takes advantage of the multiple cores more. But for camera and visual processing, it needs to be a full fat Raspberry Pi SBC - the Zero 2 W looked like a great choice until their availability become a problem.
Motor control
There are so many motor driver boards. Again, there are different approaches. For the Pico book, I used a breadboard, and a stand alone motor driver board. There wasn’t a main breakout integrating motor drivers. This fit well with the custom chassis. When the book was started, there also weren’t as many all-in-one solutions around the Raspberry Pi Pico, although contenders like the Inventor 2040w look like a great choice.
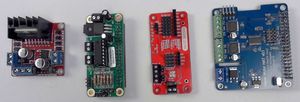
With the Raspberry Pi, a main breakout is useful to avoid a rats nest of wires. These again often incorporate motor breakouts. I originally chose a low cost DC motor and servo motor board using the PCA9865 controller (over i2c). There were a bunch of hats like this, and the Adafruit Stepper motor hat is compatible, but requires user soldering to add the servo motor breakouts. Keeping it in one hat may also reduce costs. This part is always a major consideration when reviewing the parts I suggest.
Power
I took an approach in “Learn Robotics Programming” of using two power supplies, a USB power bank for electronics like the Raspberry pi and the sensors. I was considering the power dropout factor, which can happen when there are multiple servo motors and DC motors and cause the Pi to reset. The Raspberry Pi needs a lot of power. I then have a set of batteries for the motors only, with the motor driver board distributing this voltage. This makes for a bit of weight and bulk, but saves having to deeply consider battery capabilities and see now power dropouts.
In the “Robotics at Home with Raspberry Pi Pico”, I used a UBEC - a circuit to regulate battery power into the Raspberry Pi Pico. The Pico is less sensitive to low power, and needs significantly less than the Raspberry Pi SBC’s. I also overspecced the batteries a bit to see no drop outs.
Ideally, a more seasoned robot builder would look at LiPo or LiIon options, with a charger, regulators and so on. This option will add to the cost and complexity for a beginner robot, so NiMH AA batteries and a USB power bank seem like a good compromise. I am still reviewing those compromises though.
Motors
I’ve already mentioned that I prefer the N20 metal gear motors, especially those that come as assemblies with magnetic quadrature encoders. I used these in “Robotics at Home with Raspberry Pi Pico” and think they represent really good value, they are compact, good quality (with low gearlash) and robust. However, with so few commercial chassis supporting them, they don’t work well outside of the custom chassis area. There are a few chassis that do, but they are all a little small, making it trickier to build.
For the bought chassis ideas in “Learn Robotics Programming” the TT motor types are another compromise of cost and size. They do not represent the best quality, do not come with magnetic encoders, although they often have optical encoder wheels. They are however pretty universal. I’ve been looking at the FIT-0450 TT motor assemblies with magnetic encoders, but only a few of the chassis work with them.
Sensors
With the “Robotics at Home” book, I’ve used a BNO055 IMU, two VL53L1X optical distance sensors, the encoders built into the motor assemblies and a Bluefruit UART bluetooth board. Based on the time of writing, the PicoW wasn’t yet available. This combination adds around £60 to the robot cost, but allows exploration of the MCL algorithm. It is these sensors however, that make it more than just a toy.
In “Learn Robotics Programming”, with the whole Raspberry Pi, I was able to add a camera to the build and use OpenCV - computer vision. It also has a pair of cheaper KC-SR04p ultrasonic sensors, which are not as precise as the optical ones, but keep the costs down a little, there are issues around 3v3 compatible sensors - and I am considering alternatives in the future. I used the icm20498 IMU, which is cheaper than the BNO055 but adds frustrating complexity. In future iterations, I may choose another series, as the activating ICM/TDK DMP is not really available in the Python libraries.
Software
As a rule, to keep things beginner friendly, I’ve stuck with Python throughout. There are parts in “Learn Robotics Programming” where a little html/css and JS is needed for a web control, but that is kept to a minimum. Python is not only beginner friendly, but comes up a lot in robotics research and industry, around visual processing, data processing, machine learning and so on.
While I’m familiar with C++, it’s not particularly beginner friendly. There is some C# support for the Pi, but not the Pico. I have experimented with Rust, Julia and keeping an eye on Mojo as alternatives.
Where I can, I will leverage libraries to do heavy lifting, as it’s neither realistic nor useful to build everything from scratch. That said, I’ve not dived into ROS as it’s a little heavyweight and has some compatibility problems with hardware access on the Raspberry Pi.
Another hard rule in software for me is that it is ALL open source. Readers should be able to build their robots on this code, or using the recommended CAD software, without additional license cost or the rug being pulled from them on time invested in designs. As I write new editions of books, I will of course look to update to current versions of software, but I will not be changing the software to a closed source alternative. The code from my books is all published on Github too.
I’m aware that Raspberry Pi OS has moved on a chunk since my last “Learn Robotics” book, and that the future of MyCroft is uncertain. I intend to go with offline voice recognition libraries in future work.
Summary
There are careful considerations in the recommendations for the robots I make in my book, around cost and accessibility. An experience roboticist with the right tools might throw something together with an Arduino Nano clone and a couple of spare bits for less than a tenner, but it won’t have sophisticated processing, and more importantly to me, it will not be something a beginner could repeat. I think my robots represent a good place between the really hacky robots, and the more expensive semi-professional robots like the Waffle Pi.
About My robotics books
(paid links)
If you would like to try out one of these robot builds, I recommend Robotics at Home With Raspberry Pi Pico for a beginner friendly robot build, available from Packt Publishing, Amazon and other book sellers.