A week and a half ago, I was asked to make a project to play a sound from an SD card, then record a response and play it back. This required me linking the Raspberry Pi Pico up to a few new devices.
I initially thought I would use CircuitPython due to the USB filesystem support, however, it only supports i2s output and PDM microphone input. I’d already specified an i2s input microphone. In the coming few posts I’ll write about the microphone, SD card and bringing it all together. But for now I’ll focus on the i2s audio output.
The materials
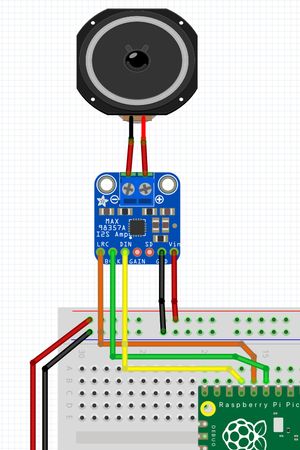
In this project I used the following for the initial prototype:
- A breadboard - 400 tie point half + type.
- A Raspberry Pi Pico
- Adafruit micro SD card breakout board
- SPH0655 MEMS I2S microphone breakout
- Adafruit I2S 3W Class D Amplifier Breakout - MAX98357A
- A bunch of breadboard jumper wires, and male-to-female jumper wires.
- A 2Gb micro sd card
Preparation
I soldered headers on all the devices (those that didn’t already have them). Then did some research on each area.
This meant collecting notes and datasheets on all the devices. I used techniques shown in Adapting Pinouts for robot worksheets to make a pinout diagram for the parts.
The I2S Amp
I start with the Amplifier, as my experience with a Pimoroni product (I can’t tell you much about it yet) had shown me that the Raspberry Pi Pico can output audio over i2s. See Foam Dart Turret With Sound for more on that.
I found an excellent resource for this amp on Adafruit.
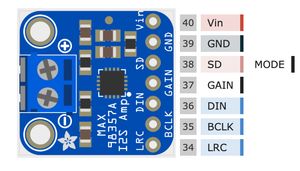
To get this to work, I needed to connect the following pins:
- Vin to 3v3
- GND to GND
- DIN to GP13
- LRC to GP12
- BCLK to GP11
These connect clock and data lines for the i2s bus, and power and ground. I left the GAIN pin unconnected, which will use the default gain. The SD pin would let us shutdown the amp, but I didn’t need that.
Dealing with WAV files
One differences between MicroPython and CircuitPython is that CircuitPython has support for the WAV file format in it’s libraries. I needed to make something similar for MicroPython. I used the WAV file format specification along with other code to work out how to read the file.
I used the python struct.unpack function to read the header of the file.
wave_file.py
import struct
class WaveFileHeader:
    @staticmethod
    def from_file(file_source):
        ident = file_source.read(4)
        if ident != b"RIFF":
            raise ValueError(f"Expected RIFF header, got {ident}.")
        file_size = struct.unpack("I",
            file_source.read(4))
        file_type = file_source.read(8)
        if file_type[:7] != b"WAVEfmt":
            raise ValueError(f"Not WAVE type. Got {file_type}")
        fmt = "IHHIIHHHI"
        fmt_size, wave_fmt, channels, sample_rate, byte_rate, block_align, bits_per_sample, extra, data_size = struct.unpack(fmt,
            file_source.read(struct.calcsize(fmt)))

        header = WaveFileHeader()
        header.wave_fmt = wave_fmt
        header.channels = channels
        header.sample_rate = sample_rate
        header.bits_per_sample = bits_per_sample
        header.data_size = data_size
        return header

    def __init__(self):
        self.data_size = 0xFFFF
        self.wave_fmt = 1 # PCM
        self.channels = 1
        self.sample_rate = 22_050
        self.bits_per_sample = 16
This class lets us represent a WAVE file header. In this case, we are looking at reading, but writing will be coming later. There’s a static method so we can create one of these classes from any file-like object. In python, anything with a read method will work.
The first thing is a check that the file is a RIFF file. After this, we get the file size. The struct.unpack function uses the ‘I’ format string to mean an unsigned integer. The next thing is the file type, which should be “WAVEfmt”. The IHHIIHHHI represents the next sequence of fields, with ‘H’ representing an unsigned short integer. We then read the rest of the header, and return the header object.
To test this I uploaded a file. Thonny or mpremote can upload the file. I used the following code to test it:
from machine import Pin
import wave_file

with open("/play_me.wav", "rb") as wav:
    print("Reading header")
    wav_header = wave_file.WaveFileHeader.from_file(wav)
    print(f"Bits per sample: {wav_header.bits_per_sample}")
    print(f"Sample rate: {wav_header.sample_rate}")
    print(f"Channels: {wav_header.channels}")
This demonstrated that the header was being read correctly when it match the info I got from a file. It took a few iterations to get this right.
Managing the Amplifier
The next thing I made was a class to handle the i2s amp. This class took some iteration to get right.
from machine import Pin, I2S
import wave_file
import ucontextlib

mp_sck_pin = Pin(11)
amp_word_select= Pin(12)
amp_data_out = Pin(13)
amp_i2s_id = 0
BUFFER_LENGTH_IN_BYTES = 40000
These set up the python modules, including the above wave file handler, and the pins for the amp.
@ucontextlib.contextmanager
def managed_amp(wav_header):
    if wav_header.channels == 1:
        channel_format = I2S.MONO
    elif wav_header.channels == 2:
        channel_format = I2S.STEREO

    amp = I2S(
        amp_i2s_id,
        sck=amp_sck_pin,
        ws=amp_word_select,
        sd=amp_data_out,
        mode=I2S.TX,
        bits=wav_header.bits_per_sample,
        format=channel_format,
        rate=wav_header.sample_rate,
        ibuf=BUFFER_LENGTH_IN_BYTES,
    )
    try:
        yield amp
    finally:
        amp.deinit()
This uses ucontextlib so the code can ensure the amp is deinitialised when we are done with it. ucontextlib needs to be installed with mip or thonny. Failing to deinit the amp can mean that the amp won’t work again until the Pico is reset.
This function decodes a wave file header, and sets up the amp ready to expect audio bytes. However, it does not play anything yet. The amp has a buffer set to 40000 bytes, to ensure that it can play a reasonable amount of audio without needing to be filled again.
def _play_file(wav_data, amp, loop=False, sample_buf = 10000):
    # allocate sample array
    # memoryview used to reduce heap allocation
    wav_samples = bytearray(sample_buf)
    wav_samples_mv = memoryview(wav_samples)

    # continuously read audio samples from the WAV file
    # and write them to an I2S DAC
    while True:
        num_read = wav_data.readinto(wav_samples_mv)
        # end of WAV file?
        if num_read == 0:
            # end-of-file, advance to first byte of Data section
            if loop:
                _ = wav_data.seek(44)
            else:
                print("end of file")
                wav_samples = bytearray(sample_buf)
                wav_samples_mv = memoryview(wav_samples)
                buffer_exhaust = int(BUFFER_LENGTH_IN_BYTES / sample_buf)
                for n in range(buffer_exhaust):
                    _ = amp.write(wav_samples_mv[:len(wav_samples)-1])
                return
        else:
            _ = amp.write(wav_samples_mv[:num_read])
This is an internal function to play a file, it can play a one shot, or loop the file. It starts by allocating a buffer, and creating a memoryview for fast access to this buffer. It then reads the file data into this buffer. If the file is finished, it will seek to the start of audio data, just past the header. If it’s not looping, we ensure that any data in the buffer is exhausted before returning - the amp buffer is 4 x the size of the sample buffer, so we need to write 4 times the sample buffer size to ensure the amp buffer is empty.
We wrap this file in a further function to play a file:
def play(filename, loop=False):
    with open(filename, "rb") as wav:
        wave_header = wave_file.WaveFileHeader.from_file(wav)
        with managed_amp(wave_header) as amp:
            _play_file(wav, amp, loop=loop)
This opens the file, reads the header, and then calls the internal _play_file function. It wraps the context manager for the anp, so if there are any problems reading the file or playing it, the amp is deinitialised.
Using this to play the file
This made playing a sound nice and easy, which I needed when integrating with other features of the project:
from managed_amp import play
play("/play_me.wav")
Notes on the file
You should ensure the audio in this file is normalised - that is, it does not have a DC offset. A DC offset can damage the speaker. I used Audacity to normalise the audio and exported the wav file.
It can be 16 or 32 bit PCM and the datasheet suggests sample rates from 8khz to 96khz. The amp datasheet has more details.
Summary
This is the first part of the project. I’ll be writing more about the other parts of the project in the future as it’s a little too much for one blog post